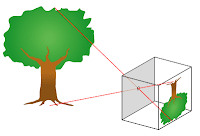
 Because there's no lense to focus the light, the images are fuzzier than normal photographs, and the exposure time is very long (about 1 min generally, although it varies). The round shape of the Milo tin also gives the photo a sort of distorted look, but I think that adds to the effect. Because the exposure time is so long, and you only get one chance (once the paper is exposed there's no going back), it forces you to really think about the composition of your photo. I think it therefore one of the more intelligent forms of photography: you can't just point and snap.
To explain the process a li
 ttle:
ttle:- Place a piece of photographic paper in a pin hole camera, opposite the hole (done in a darkroom under safe lights so the paper is not exposed).
- Keeping the hole in the camera covered, leave the dark room and find something you want to take a photo of.
- Uncover the hole, making sure to keep the camera completely still (place on a flat surface).
- Expose the paper for approximately 60 seconds depending on the amount of light availabe. This varies alot and needs some experimentation to get it right!
- Recover the hole, and return to the dark room.
- Remove the paper from the camera.
- Develop the photo by placing the paper first in the Developer Chemical (60 seconds, agitating)
- Then in the Stop Bath Chemical (30 seconds, agitating)
- Finally, the Fixer chemical (5 minutes)
- Then rinse the paper with water and leave to soak to completely remove the chemicals. You now have negative image.
- Let dry and then scan onto the computer.
- Use photoshop to invert the image so you can finish with a positive image.
 I found getting the exposure time right extremely difficult. I often ended up with photos that were either completely black or completely white. Because the process takes so long this can be very frustrating. On the other hand, when you do get it right, there is nothing more satisfying and exciting. Watching the image appear on the paper in the developper is like magic.
No comments:
Post a Comment